Running Juniper SA SPE on VirtualBox using Named Pipes

This article explains howto run the Juniper Virtual Appliance on VirtualBox and hopefully Oracle VM.


  • First Install VirtualBox
  • Download the Juniper Virtual Appliance SA SPE and unzip the file into a folder.
  • Import the appliance as OVF.
  • Create a 10 Gig Dynamic VDI for the Disk.
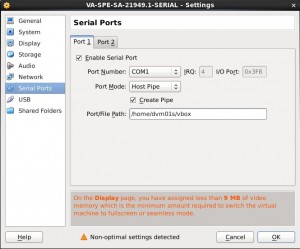
  • Since the Juniper Appliance needs a serial console to access, we need to enable the Com1 serial device with “Host Pipe” enabled as shown below.

vbox1

  • In order to connect to the VirtualBox serial connections I used 2 additional tools. Putty and Socat
  • I am using Oracle Enterprise Linux 6 (Redhat 6) so I installed both programs.
  • yum install socat
  • yum install putty
  • Next, you need to start your Juniper VM, it will basically look like it is hanging but it is not. The first time it is run, it is asking for setup information on the serial console which to this point is hidden.
  • Next you need to run the socat program. Socat is a relay for bidirectional data transfers between two independent data channels.
  • Since you set your Serial Pipe in VirtualBox to be “/home/dvm01s/vbox” this is the command line to get socat up and running.
  • socat -d -d -d /home/dvm01s/vbox tcp4-listen:9988
  • Now that socat is up and running you should see something like this:
[dvm01s@penguin init]$ socat -d -d -d /home/dvm01s/vbox tcp4-listen:9988
2013/01/12 16:17:18 socat[24076] I socat by Gerhard Rieger - see www.dest-unreach.org
2013/01/12 16:17:18 socat[24076] I This product includes software developed by the OpenSSL Project for use in the OpenSSL Toolkit. (http://www.openssl.org/)
2013/01/12 16:17:18 socat[24076] I This product includes software written by Tim Hudson ([email protected])
2013/01/12 16:17:18 socat[24076] I interpreting address "/home/dvm01s/vbox" as file name
2013/01/12 16:17:18 socat[24076] I "/home/dvm01s/vbox" is not a socket, open()'ing it
2013/01/12 16:17:18 socat[24076] N opening undef "/home/dvm01s/vbox" for reading and writing
2013/01/12 16:17:18 socat[24076] I open("/home/dvm01s/vbox", 0102, 0666) -> 3
2013/01/12 16:17:18 socat[24076] I socket(2, 1, 6) -> 4
2013/01/12 16:17:18 socat[24076] I starting accept loop
2013/01/12 16:17:18 socat[24076] N listening on AF=2 0.0.0.0:9988


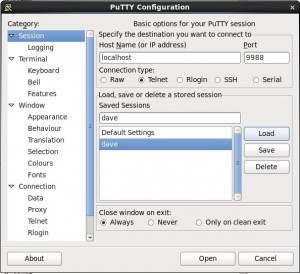
  • Once that is up all you need to do is connect to the port using putty.

vbox2

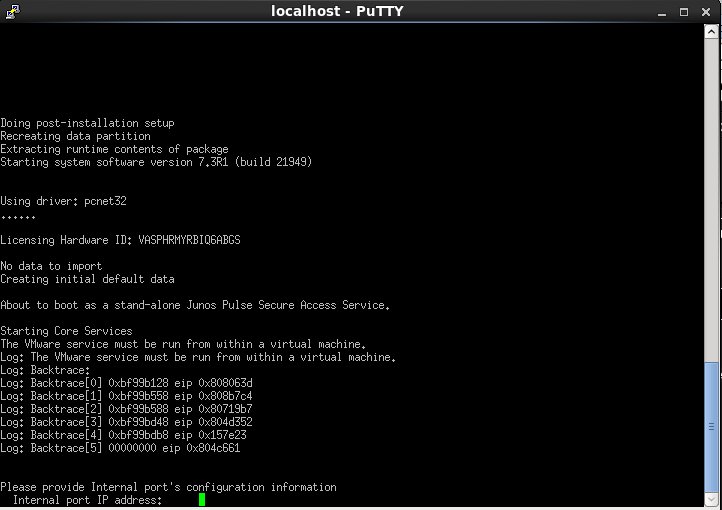
  •  Connect and you should be in business!

vbox3


Backup and Restore Magento

This explains howto export and import all the data and images from a Magento Ecommerce system.


  • First from the export machine, goto the the Admin for Magento. Then System / Import-Export / Dataflow-Profiles / Export All Products.
  • Then choose Run Profile from the Menu on left.
  • This will create a local file on the server usually under /var/export/export_all_products.csv
  • Copy this to your import server.
  • Zip up your product images under /media/catalog/product
  • Copy those over to your /media/import directory on the Import Server. Should look like this
  • /magento/media/catalog/media/import/2/4/image.jpg       etc.
  • On the Import machine, now goto System / Import-Export / Dataflow-Profiles and click on Import All Products.
  • Choose the export_all_products.csv from the export before and upload.
  • Run the import profile

voila


Fixing OVM 3.1.1 Database

I found myself in a situation where I had “ghost” repository servers in presented to my nfs repository. This stopped my from being able to import anything into the repository. Not good. So I found this quick fix….


Ran as follows:
/etc/init.d/ovmm stop

NOTE: cat /u01/app/oracle/ovm-manager-3/.config (This provides some of the info you need to connect to your db if you have forgotten.)

cd /u01/app/oracle/ovm-manager-3/bin/
./ovm_upgrade.sh –fixup –dbhost=localhost –dbport=1521 –dbsid=OVM –dbuser=ovs –dbpass=password

This ran fixed errors.

Restarted OVM Manager:
/etc/init.d/ovmm start

Upgrade Oracle VM 3.0.3 to 3.1.1

  • Download patches

p14227416_30_Linux-x86-64.zip = OVM Manager Upgrade
p14775391_30_Linux-x86-64.zip = OVM Server Upgrade


  • OVM Manager Upgrade.
    • Unzip and mount the iso inside the zip file

[root@ovmm303 ~]# unzip p14227416_30_Linux-x86-64.zip
Archive:  p14227416_30_Linux-x86-64.zip
inflating: ovmm-3.1.1-upgrade-b544.iso
inflating: README.html
[root@ovmm303 ~]# mount -o loop ovmm-3.1.1-upgrade-b544.iso /cdrom
[root@ovmm303 ~]# cd /cdrom
[root@ovmm303 cdrom]# ls
components  EULA  LICENSE  runUpgrader.sh  TRANS.TBL  upgrade
[root@ovmm303 cdrom]# ./runUpgrader.sh
Stating OVM Manager upgrade on Wed Dec 12 10:05:19 EST 2012

Oracle VM Manager 3.1.1.544 upgrade utility
Upgrade logfile : /tmp/upgrade-2012-12-12-05.log

It is highly recommended to do a full database repository backup prior to upgrading Oracle VM Manager …

Press any key to continue …

Oracle VM Manager is running …
Verifying installation status …
Read Oracle VM Manager config file …
Found Oracle VM Manager install files …
Found Oracle VM Manager upgrader …
Found Oracle WebLogic Server …
Found Java …
Using the following information :
Database Host          : localhost
Database SID           : XE
Database LSNR          : 1521
Oracle VM Schema       : ovs
Oracle VM Manager UUID : 0004fb000001000081a554868ca45cb1
Current Build ID       : 3.0.3.126
Upgrade from version   : 3.0.3
Upgrade to version     : 3.1.1
Using /tmp/workdir.jTJCQ31547 for backup and export location.
Using /tmp/patchdir.QCxj31548 for patching.
Enter password for user ovs :
Undeploying previous version of Oracle VM Manager application …
Undeploying Oracle VM Manager help …
Undeploying Oracle VM Manager console …
Undeploying Oracle VM Manager core …
Waiting for Oracle VM Manager core to fully undeploy…
Waiting…
Finished undeploying previous version …
Exporting Oracle VM Manager repository …
Please wait as this can take a long time …
Oracle VM Manager repository export completed …
Creating backup file …
Oracle VM Manager repository backup in /tmp/ovm-manager-3-backup-2012-12-12.zip
Upgrading Oracle VM Manager …
Backing up old files to /tmp/ovm-manager-3-backup-2012-12-12-101102…
Removing old files …
Unpacking Oracle VM Manager 3.1.1.544
`transform_003001001000_010.xsl’ -> `/tmp/patchdir.QCxj31548/transform_003001001000_010.xsl’
`transform_003001001000_020.xsl’ -> `/tmp/patchdir.QCxj31548/transform_003001001000_020.xsl’
`deletedClasses.xml’ -> `/tmp/patchdir.QCxj31548/deletedClasses.xml’
Filtering full repository export to the selective export subset at /tmp/workdir_sel.HFTMI31904 …
cp: omitting directory `/tmp/workdir.jTJCQ31547/jrnl’
cp: omitting directory `/tmp/workdir.jTJCQ31547/objs’
adding: objs/19/193.cl.xml (deflated 70%)
adding: objs/16/161.cl.xml (deflated 67%)
adding: objs/9.cl.xml (deflated 93%)

Selective export is at /tmp/workdir_sel.HFTMI31904
3 objects selected (out of 906) to be upgraded
Transform XSL files used:
-rw-r–r– 1 root root 56678 Dec 12 10:11 /tmp/patchdir.QCxj31548/transform_003001001000_010.xsl
-rw-r–r– 1 root root 10079 Dec 12 10:11 /tmp/patchdir.QCxj31548/transform_003001001000_020.xsl
Changed classes encountered in selective export set:

com.oracle.ovm.mgr.api.manager.BusinessManagerDbImpl
com.oracle.ovm.mgr.api.manager.ModelManagerDbImpl
com.oracle.ovm.mgr.api.manager.RasManagerDbImpl

Upgrading Oracle VM Manager repository …
Please wait as this can take a long time …
Oracle VM Manager repository upgrade completed …
Validating Oracle VM Manager repository …
Oracle VM Manager repository validation completed …
Refresh system-jazn-data.xml file …
Redeploying Oracle VM Manager core container …
Redeploying Oracle VM Manager console …
Redeploying Oracle VM Manager help …
Install ADF Patch …
Unpacking Oracle VM Manager OVM CLI Tool
iptables v1.3.5: Unknown arg `-S’
Try `iptables -h’ or ‘iptables –help’ for more information.
Completed upgrade to 3.1.1.544 …
Writing updated config in /u01/app/oracle/ovm-manager-3/.config
Restart WebLogic …
Stopping Oracle VM Manager                                 [  OK  ]
Starting Oracle VM Manager                                 [  OK  ]

OVM Manager upgrade finished on Wed Dec 12 10:18:13 EST 2012


Oracle VM Server Upgrade

  • unzip the patch iso file and mount it in your server for booting.
  • Reboot server and follow the screens.
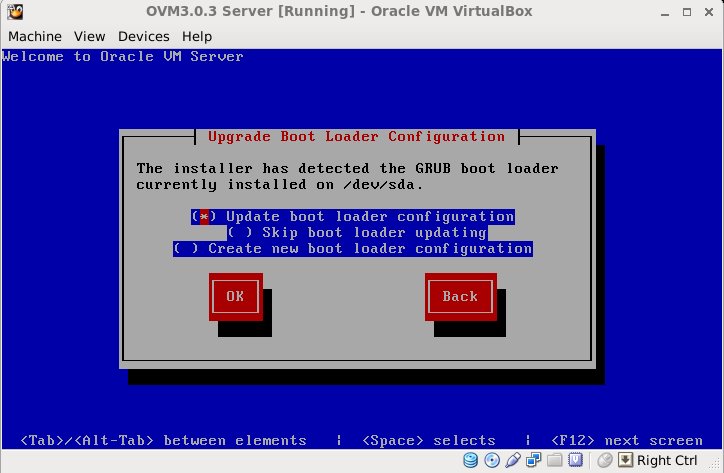
  • Choose “Oracle VM server 3.1.1 (sda2)


Citrix Receiver install on OEL / Redhat 6.3

Download and install Citrix Reciver client

Install complained about alsa-lib sounds drivers. Apparently it needs 32bit alsa-lib so:

yum install alsa-lib.i686

Install complained about libcrypto so had to install the 32bit openssl

yum install openssl.i686

Modify the /opt/Citrix/ICAClient/util/integrate.sh script to include the correct Firefox config executable.

##########

found_netscape()
{
ALREADY_MIMETYPE=0
ALREADY_MAILCAP=0
arch=`uname -m`
if [ “$arch” = “x86_64” -a “$op_system” = “Linux” ]
then
# On 64 bit platforms one call to nspluginwrapper does all the work of
# linking.
mozilla-plugin-config -i $INST_DIR/npica.so
LINK_PLUGIN=0
else
LINK_PLUGIN=1
fi
################

After modifying integrate.sh you need to run it.

./integrate.sh

Next depending on your Company’s certificates, you may need to download the root certs from the cert provider.

http://www.geotrust.com/resources/root-certificates/index.html

Right click on “Geotrust Global CA” and save to your desktop as a .crt file
http://www.geotrust.com/resources/root_certificates/certificates/GeoTrust_Global_CA.pem

Right click on “Equifax Secure eBusiness CA-1” and save to your desktop as a .crt file
http://www.geotrust.com/resources/root_certificates/certificates/Equifax_Secure_eBusiness_CA-1.pem

Close Firefox and copy the two crt files into your Citrix cacerts directory.

cp ~/*.crt /opt/Citrix/ICAClient/keystore/cacerts

Restart Firefox and you should be good to go!

#######UPDATE##########

This also fixes the SSL issues. You do not need to download any Certs.

ln -s /etc/ssl/certs/* /opt/Citrix/ICAClient/keystore/cacerts/