40″ Monitor – Black Friday Special

Well, it’s Black Friday 2013 and I managed to only spend a little. But what I got was so cool, i had to write about it…

I spend a lot of time in front of my computer, more that I would like to admit. My job basically ensures I am in front of a computer at least 5 hours a day. So, this Black Friday I splurged.

0060958523602_A

My setup consisted of a 24″ AOC Monitor next to a 27″ Dell. The Dell is beautiful but the AOC had some pixels missing and picture was so so. So, I almost made it through BF without spending the usual 1g but rounding out the night at Target of all places, I saw this one lone Magnovox Doorbuster sitting there waiting for me to take him home.

I originally was looking at at cheap Westinghouse 37″  720p resoution for $260 or so but wasn’t completely sold. I knew that after I took it home, looking at a display of 1280×720 would not cut it.

So for $299 i picked up a 40″ 1080p Magnovox 40ME313V TV/Monitor for my PC setup. As I am typing now, let’s just say it is awesome. The screen is basically a wall in front of me and resolution, picture quality is great. My 27″ Dell looks like little bro next to this monstrous piece of electronics.

So, if you’re looking for a cool upgrade to your PC and don’t want to spend 1000+ dollars, this one for you.

Slow internet speeds at Starbucks

As I sit here in Starbucks, waiting for my 1MB file to download, i thought I would write this small blurb on how the AT&T / Starbucks union has failed. It seems that AT&T has turned down the dial on the throughput that is allowed on its wireless networking. I have experienced this on at least 4 local Starbucks where download / upload speeds are basically unusable.

Previously, speeds were at least 1-2 Mbps and now are 400 Kbps. In my profession, i connect remotely to work so I need a minimum of 1 Mbps to work efficiently.

I understand that bandwidth costs money but throttling down internet speeds actually decreases business for Starbucks, at least in my case. Now I make the 100yd walk to Panera now which has great internet services.

I spend “A LOT” at Starbucks, easily over $50 a month, come on guys get with the program. Welcome to the 10’s


Enable VisualVM for remote monitoring of Java

Step 1: get jstatd running.

If jstatd is not running,  create a file called jstatd.all.policy with the following contents:

grant codebase "file:${java.home}/../lib/tools.jar" { permission java.security.AllPermission;};

Start jstatd as follows:

nohup jstatd -J-Djava.security.policy=/path/to/your/jstatd.all.policy &

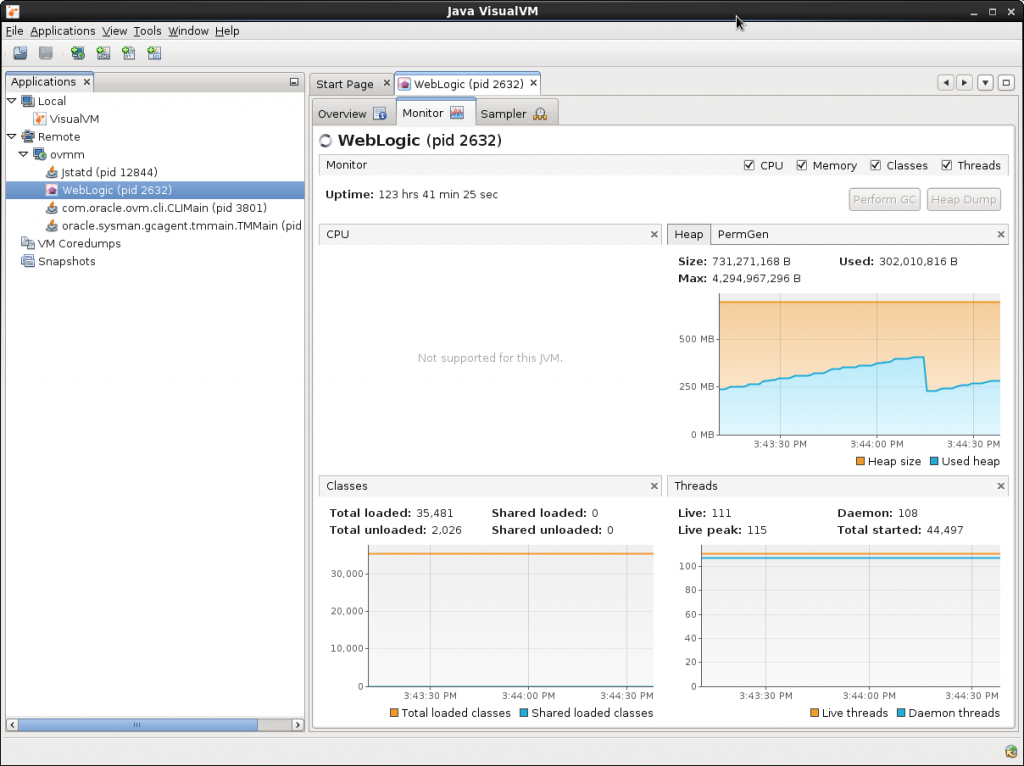
Step 2: Start Remote jvisualvm


/usr/java/jdk1.7.0_25/bin/jvisualvm


Screenshot-Java VisualVM

Oracle Weblogic Start Scripts for Linux

Create Startup scripts for Weblogic Admin server and NodeManager


The following instructions are for creating Linux Startup scripts for Weblogic 10.x This procedure uses RC scripts for starting / shutting down the process as a UNIX daemon.


  • Login to a root account
  • Create the following file in the /etc/init.d/weblogic_start with the following contents. Modify to match your specific environment
su – oracle -c “nohup /u01/app/oracle/middleware/user_projects/domains/DEV_domain/bin/startWebLogic.sh &”
su – oracle -c “nohup /u01/app/oracle/middleware/user_projects/domains/DEV_domain/bin/startNodeManager.sh &”


  • This will start the weblogic admin process as a specified user “oracle” and run it in the background.
  • This will also start the NodeManager if configured.
su – oracle -c “/u01/app/oracle/middleware/user_projects/domains/DEV_domain/bin/stopWebLogic.sh”
kill -9 `ps -ef | grep weblogic.Node | grep jdk | awk ‘{print $2 }’`


  • The image above shows the /etc/init.d/weblogic_stop script which will stop the Weblogic Admin server as well as stop the NodeManager.


  • Next step is to create the symbolic links in the /etc/rc3.d directory so things will stop and start correctly.
  • From the /etc/rc3.d directly you will need to run the following command to link the new weblogic_start and weblogic_stop scripts. Make sure you use the “S80” and “K20” in the names of the startup links.cd /etc/rc3.d
    ln -s ../init.d/weblogic_start S80weblogic_start
    ln -s ../init.d/weblogic_stop K20weblogic_stop

    Things should look like this:

    lrwxrwxrwx. 1 root root 24 Apr 30 17:39 S80weblogic_start -> ../init.d/weblogic_start
    lrwxrwxrwx. 1 root root 23 Apr 30 17:39 K20weblogic_stop -> ../init.d/weblogic_stop


  • To test first make sure the commands run and work as designed.As root:
    /etc/init.d/weblogic_start
    /etc/init.d/weblogic_stop
  • Next stop is to reboot and verify that the services come up and are functional.

Bulletproof SSH Tunnel using Cygwin and AutoSSH

Ever try to get around those pesky firewalls at work? Well here is a way to setup permanent SSH tunnels that will self heal! The main reason I set this up was so that I wouldn’t have to keep setting up firewall holes in my remote routers. All of my systems now phone home and allow me to always have permanent connections.

You will need the following:

  • autossh
  • cygwin on Windows 7
  • cygrunsrv on cygwin
  • cron on cygwin
  • openssh on cygwin

Setup your shared keys between your servers. Make sure you are using the same user across both machines.

  • ssh-keygen.exe -t rsa
  • scp ~/.ssh/id_rsa.pub to your remote host and put in ~/.ssh/authorized_keys2 file
  • test “ssh user@remotehost”

Setup autossh on Cygwin

  • just install it from repository

Create a tunnel script on your originating server.
/home/user/tuncheck.sh

a=(`ps -ef | grep autossh | grep -v grep`)
if [ ! “$a” ]; then  /usr/bin/autossh.exe -M 10984 -N -f -R 6666:localhost:22 user@remotehost -p 40022 &
fi

Install CRON for Cygwin and run cron-config to setup cron. Just take the defaults but add your username and password.

  • run cygwin setup.exe to install cron
  • run “cron-config” to setup cron
  • start up the cron service “net start cron”

Add the check script to the users’ crontab

  • crontab -e
  • * * * * /home/user/tuncheck.sh
  • run “crontab -l” to verify

Verify operation

  • on originating server run “ps -ef |grep auto”
  • You should see the process running “14:50:01 /usr/bin/autossh”
  • on remote server run “ssh -p 6666 user@localhost”
  • You should get logged onto the originating server.

Dont forget to turn off your power management on the originating server. Needs to stay alive!

Enjoy!