The following scripts and procedure allows stopping and starting of Weblogic Instances using Jython (Python) scripts and the nodemanager. Services are then created and can be used at startup and shutown for your NodeManager, Admin Server, and Managed Servers.
Assumptions:
Version = Weblogic 10.3.6
MW_HOME = /u01/app/oracle/weblogic1036R2
JAVA_HOME = /u01/app/jdk
DOMAIN = IDMdomain
BOOTSCRIPTS LOCATION = /u01/app/oracle/$MW_HOME/bootscripts
Node Manager is installed and configured.
Configure the nodemanager as follows
#Wed Nov 12 14:39:50 EST 2014
DomainsFile=/u01/app/oracle/weblogic1036R2/wlserver_10.3/common/nodemanager/nodemanager.domains
LogLimit=0
PropertiesVersion=10.3
DomainsDirRemoteSharingEnabled=false
javaHome=/u01/app/oracle/jrockit-jdk
AuthenticationEnabled=false
NodeManagerHome=/u01/app/oracle/weblogic1036R2/wlserver_10.3/common/nodemanager
LogLevel=INFO
DomainsFileEnabled=true
StartScriptName=startWebLogic.sh
ListenAddress=oam1
NativeVersionEnabled=true
ListenPort=5556
LogToStderr=true
SecureListener=false
LogCount=1
DomainRegistrationEnabled=false
StopScriptEnabled=true
QuitEnabled=false
LogAppend=true
StateCheckInterval=500
CrashRecoveryEnabled=false
StartScriptEnabled=true
LogFile=/u01/app/oracle/weblogic1036R2/wlserver_10.3/common/nodemanager/nodemanager.log
LogFormatter=weblogic.nodemanager.server.LogFormatter
ListenBacklog=50
|
Create the main wls.py script
import sys
def startAdmin():
    print 'Starting AdminServer'
    nmConnect(userConfigFile=nmUserFile, userKeyFile=nmKeyFile, host=nmHost, port=nmPort, domainName=domain, domainDir=domainPath, nmType=nmType)
    nmStart('AdminServer')
    nmDisconnect()
    return
def stopAdmin():
    print 'Stopping AdminServer'
    connect(userConfigFile=wlsUserFile, userKeyFile=wlsKeyFile, url=adminUrl)
    shutdown('AdminServer', force='true')
    return

def startManaged(managed):
    print 'Starting ', managed
    connect(userConfigFile=wlsUserFile, userKeyFile=wlsKeyFile, url=adminUrl)
    start(managed)
    disconnect()
    return
def stopManaged(managed):
    print 'Stopping ', managed
    connect(userConfigFile=wlsUserFile, userKeyFile=wlsKeyFile, url=adminUrl)
    shutdown(managed, force='true')
    disconnect()
    return
if ((len(sys.argv) < 2) | (len(sys.argv) > 3)):
    print ' Wrong number of arguments'
elif (sys.argv[1] == 'startadmin'):
    startAdmin()
elif (sys.argv[1] == 'stopadmin'):
    stopAdmin()
elif (sys.argv[1] == 'start'):
    startManaged(sys.argv[2])
elif (sys.argv[1] == 'stop'):
    stopManaged(sys.argv[2])
|
Next is the startall.sh script
/u01/app/oracle/weblogic1036R2/wlserver_10.3/common/bin/wlst.sh -loadProperties /u01/app/oracle/weblogic1036R2/bootscripts/config.properties -skipWLSModuleScanning /u01/app/oracle/weblogic1036R2/bootscripts/wls.py startadmin
/u01/app/oracle/weblogic1036R2/wlserver_10.3/common/bin/wlst.sh -loadProperties /u01/app/oracle/weblogic1036R2/bootscripts/config.properties -skipWLSModuleScanning /u01/app/oracle/weblogic1036R2/bootscripts/wls.py start oam_server1
|
stopall.sh
/u01/app/oracle/weblogic1036R2/Oracle_IDM1/common/bin/wlst.sh -loadProperties /u01/app/oracle/weblogic1036R2/bootscripts/config.properties -skipWLSModuleScanning /u01/app/oracle/weblogic1036R2/bootscripts/wls.py stop oam_server1
/u01/app/oracle/weblogic1036R2/Oracle_IDM1/common/bin/wlst.sh -loadProperties /u01/app/oracle/weblogic1036R2/bootscripts/config.properties -skipWLSModuleScanning /u01/app/oracle/weblogic1036R2/bootscripts/wls.py stopadmin
|
config.properties
adminUrl=t3://10.128.14.181:7001
nmHost=oam1
nmPort=5556
nmUserFile=/u01/app/oracle/config/nmUserFile
nmKeyFile=/u01/app/oracle/config/nmKeyFile
nmType=plain
wlsUserFile=/u01/app/oracle/config/wlsUserFile
wlsKeyFile=/u01/app/oracle/config/wlsKeyFile
domain=OAM_domain
domainPath=/u01/app/oracle/weblogic1036R2/user_projects/domains/OAM_domain
|
Before running this command (deprecated in 12c, but still works in 12.1.3), you must source setDomainEnv.sh for the domain you are using.
Encrypt username and password (11g)
source /u01/app/oracle/weblogic1036R2/user_projects/domains/OAM_domain/bin/setDomainEnv.sh
|
Then run this command to create your encrypted User and Key files
java weblogic.Admin -username weblogic -userconfigfile /u01/app/oracle/config/nmUserFile -userkeyfile /u01/app/oracle/config/nmKeyFile STOREUSERCONFIG
|
Encrypt credentials for Weblogic
java weblogic.Admin -username weblogic -userconfigfile /u01/app/oracle/config/wlsUserFile -userkeyfile /u01/app/oracle/config/wlsKeyFile STOREUSERCONFIG
|
Now create your init.d startup scripts
/etc/init.d/nodemanager
#!/bin/sh
#
# nodemanager Oracle Weblogic NodeManager service
#
# chkconfig:   345 85 15
# description: Oracle Weblogic NodeManager service
### BEGIN INIT INFO
# Provides: nodemanager
# Required-Start: $network $local_fs
# Required-Stop:
# Should-Start:
# Should-Stop:
# Default-Start: 3 4 5
# Default-Stop: 0 1 2 6
# Short-Description: Oracle Weblogic NodeManager service.
# Description: Starts and stops Oracle Weblogic NodeManager.
### END INIT INFO
. /etc/rc.d/init.d/functions
# Your WLS home directory (where wlserver is)
export MW_HOME="/u01/app/oracle/weblogic1036R2"
export JAVA_HOME="/u01/app/oracle/jrockit-jdk"
DAEMON_USER="oracle"
PROCESS_STRING="^.*weblogic.NodeManager.*"
source $MW_HOME/wlserver_10.3/server/bin/setWLSEnv.sh > /dev/null
export NodeManagerHome="$WL_HOME/common/nodemanager"
NodeManagerLockFile="$NodeManagerHome/nodemanager.log.lck"
PROGRAM="/u01/app/oracle/weblogic1036R2/user_projects/domains/OAM_domain/bin/startNodeManager.sh"
SERVICE_NAME=`/bin/basename $0`
LOCKFILE="/var/lock/subsys/$SERVICE_NAME"
RETVAL=0
start() {
        OLDPID=`/usr/bin/pgrep -f $PROCESS_STRING`
        if [ ! -z "$OLDPID" ]; then
            echo "$SERVICE_NAME is already running (pid $OLDPID) !"
            exit
        fi
        echo -n $"Starting $SERVICE_NAME: "
        /bin/su $DAEMON_USER -c "$PROGRAM &"
        RETVAL=$?
        echo
        [ $RETVAL -eq 0 ] && touch $LOCKFILE
}
stop() {
        echo -n $"Stopping $SERVICE_NAME: "
        OLDPID=`/usr/bin/pgrep -f $PROCESS_STRING`
        if [ "$OLDPID" != "" ]; then
            /bin/kill -TERM $OLDPID
        else
            /bin/echo "$SERVICE_NAME is stopped"
        fi
        echo
        /bin/rm -f $NodeManagerLockFile
        [ $RETVAL -eq 0 ] && rm -f $LOCKFILE
}
restart() {
        stop
        sleep 10
        start
}
case "$1" in
  start)
        start
        ;;
  stop)
        stop
        ;;
  restart|force-reload|reload)
        restart
        ;;
  *)
        echo $"Usage: $0 {start|stop|restart}"
        exit 1
esac
exit $RETVAL
|
The weblogic scripts call the startall.sh when the server starts, and stopall.sh when the server stops.
/etc/init.d/weblogic
#!/bin/sh
#
# weblogic Oracle Weblogic start
#
# chkconfig: 345 85 15
# description: Oracle Weblogic service
### BEGIN INIT INFO
# Provides:
# Required-Start: $nodemanager
# Required-Stop:
# Should-Start:
# Should-Stop:
# Default-Start: 3 4 5
# Default-Stop: 0 1 2 6
# Short-Description: Oracle Weblogic service.
# Description: Starts and stops Oracle Weblogic.
### END INIT INFO
 . /etc/rc.d/init.d/functions
# Your WLS home directory (where wlserver is)
export MW_HOME="/u01/app/oracle/weblogic1036R2"
export BOOT_HOME="$MW_HOME/bootscripts"
export JAVA_HOME="/u01/app/oracle/jrockit-jdk"
DAEMON_USER="oracle"
source $MW_HOME/wlserver_10.3/server/bin/setWLSEnv.sh > /dev/null
PROGRAM_START="$BOOT_HOME/startall.sh"
PROGRAM_STOP="$BOOT_HOME/stopall.sh"
SERVICE_NAME=`/bin/basename $0`
LOCKFILE="/var/lock/subsys/$SERVICE_NAME"
RETVAL=0
start() {
 echo -n $"Starting $SERVICE_NAME: "
 /bin/su $DAEMON_USER -c "$PROGRAM_START &" RETVAL=$?
 echo [ $RETVAL -eq 0 ] && touch $LOCKFILE
}
 stop() {
 echo -n $"Stopping $SERVICE_NAME: "
 /bin/su $DAEMON_USER -c "$PROGRAM_STOP &" RETVAL=$?
 [ $RETVAL -eq 0 ] && rm -f $LOCKFILE
 }
 restart() {
 stop
 sleep 10
 start
}
case "$1" in
 start)
        start
        ;;
 stop)
        stop
        ;;
 restart|force-reload|reload)
        restart
        ;;
 *)
        echo $"Usage: $0 {start|stop|restart}"
esac
exit 1
|
Both the nodemanager and weblogic startup scripts need to made runable (chmod 755) and then added to chkconfig
chkconfig --add weblogic
chkconfig --add nodemanager
|
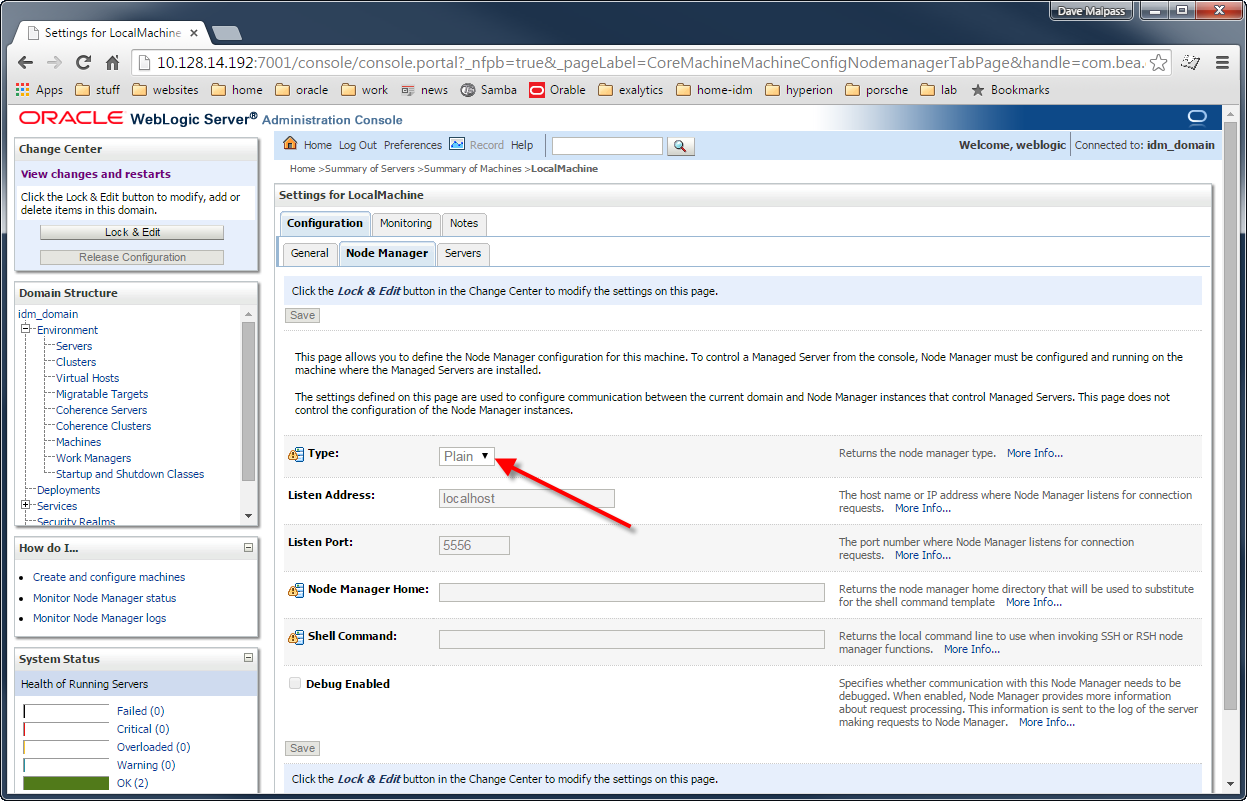
Update your Nodemanager type to be “Plain”

This can be done for each domain on your server
Well Done! Grab a beer