Fixing OVM 3.1.1 Database

I found myself in a situation where I had “ghost” repository servers in presented to my nfs repository. This stopped my from being able to import anything into the repository. Not good. So I found this quick fix….


Ran as follows:
/etc/init.d/ovmm stop

NOTE: cat /u01/app/oracle/ovm-manager-3/.config (This provides some of the info you need to connect to your db if you have forgotten.)

cd /u01/app/oracle/ovm-manager-3/bin/
./ovm_upgrade.sh –fixup –dbhost=localhost –dbport=1521 –dbsid=OVM –dbuser=ovs –dbpass=password

This ran fixed errors.

Restarted OVM Manager:
/etc/init.d/ovmm start

Upgrade Oracle VM 3.0.3 to 3.1.1

  • Download patches

p14227416_30_Linux-x86-64.zip = OVM Manager Upgrade
p14775391_30_Linux-x86-64.zip = OVM Server Upgrade


  • OVM Manager Upgrade.
    • Unzip and mount the iso inside the zip file

[root@ovmm303 ~]# unzip p14227416_30_Linux-x86-64.zip
Archive:  p14227416_30_Linux-x86-64.zip
inflating: ovmm-3.1.1-upgrade-b544.iso
inflating: README.html
[root@ovmm303 ~]# mount -o loop ovmm-3.1.1-upgrade-b544.iso /cdrom
[root@ovmm303 ~]# cd /cdrom
[root@ovmm303 cdrom]# ls
components  EULA  LICENSE  runUpgrader.sh  TRANS.TBL  upgrade
[root@ovmm303 cdrom]# ./runUpgrader.sh
Stating OVM Manager upgrade on Wed Dec 12 10:05:19 EST 2012

Oracle VM Manager 3.1.1.544 upgrade utility
Upgrade logfile : /tmp/upgrade-2012-12-12-05.log

It is highly recommended to do a full database repository backup prior to upgrading Oracle VM Manager …

Press any key to continue …

Oracle VM Manager is running …
Verifying installation status …
Read Oracle VM Manager config file …
Found Oracle VM Manager install files …
Found Oracle VM Manager upgrader …
Found Oracle WebLogic Server …
Found Java …
Using the following information :
Database Host          : localhost
Database SID           : XE
Database LSNR          : 1521
Oracle VM Schema       : ovs
Oracle VM Manager UUID : 0004fb000001000081a554868ca45cb1
Current Build ID       : 3.0.3.126
Upgrade from version   : 3.0.3
Upgrade to version     : 3.1.1
Using /tmp/workdir.jTJCQ31547 for backup and export location.
Using /tmp/patchdir.QCxj31548 for patching.
Enter password for user ovs :
Undeploying previous version of Oracle VM Manager application …
Undeploying Oracle VM Manager help …
Undeploying Oracle VM Manager console …
Undeploying Oracle VM Manager core …
Waiting for Oracle VM Manager core to fully undeploy…
Waiting…
Finished undeploying previous version …
Exporting Oracle VM Manager repository …
Please wait as this can take a long time …
Oracle VM Manager repository export completed …
Creating backup file …
Oracle VM Manager repository backup in /tmp/ovm-manager-3-backup-2012-12-12.zip
Upgrading Oracle VM Manager …
Backing up old files to /tmp/ovm-manager-3-backup-2012-12-12-101102…
Removing old files …
Unpacking Oracle VM Manager 3.1.1.544
`transform_003001001000_010.xsl’ -> `/tmp/patchdir.QCxj31548/transform_003001001000_010.xsl’
`transform_003001001000_020.xsl’ -> `/tmp/patchdir.QCxj31548/transform_003001001000_020.xsl’
`deletedClasses.xml’ -> `/tmp/patchdir.QCxj31548/deletedClasses.xml’
Filtering full repository export to the selective export subset at /tmp/workdir_sel.HFTMI31904 …
cp: omitting directory `/tmp/workdir.jTJCQ31547/jrnl’
cp: omitting directory `/tmp/workdir.jTJCQ31547/objs’
adding: objs/19/193.cl.xml (deflated 70%)
adding: objs/16/161.cl.xml (deflated 67%)
adding: objs/9.cl.xml (deflated 93%)

Selective export is at /tmp/workdir_sel.HFTMI31904
3 objects selected (out of 906) to be upgraded
Transform XSL files used:
-rw-r–r– 1 root root 56678 Dec 12 10:11 /tmp/patchdir.QCxj31548/transform_003001001000_010.xsl
-rw-r–r– 1 root root 10079 Dec 12 10:11 /tmp/patchdir.QCxj31548/transform_003001001000_020.xsl
Changed classes encountered in selective export set:

com.oracle.ovm.mgr.api.manager.BusinessManagerDbImpl
com.oracle.ovm.mgr.api.manager.ModelManagerDbImpl
com.oracle.ovm.mgr.api.manager.RasManagerDbImpl

Upgrading Oracle VM Manager repository …
Please wait as this can take a long time …
Oracle VM Manager repository upgrade completed …
Validating Oracle VM Manager repository …
Oracle VM Manager repository validation completed …
Refresh system-jazn-data.xml file …
Redeploying Oracle VM Manager core container …
Redeploying Oracle VM Manager console …
Redeploying Oracle VM Manager help …
Install ADF Patch …
Unpacking Oracle VM Manager OVM CLI Tool
iptables v1.3.5: Unknown arg `-S’
Try `iptables -h’ or ‘iptables –help’ for more information.
Completed upgrade to 3.1.1.544 …
Writing updated config in /u01/app/oracle/ovm-manager-3/.config
Restart WebLogic …
Stopping Oracle VM Manager                                 [  OK  ]
Starting Oracle VM Manager                                 [  OK  ]

OVM Manager upgrade finished on Wed Dec 12 10:18:13 EST 2012


Oracle VM Server Upgrade

  • unzip the patch iso file and mount it in your server for booting.
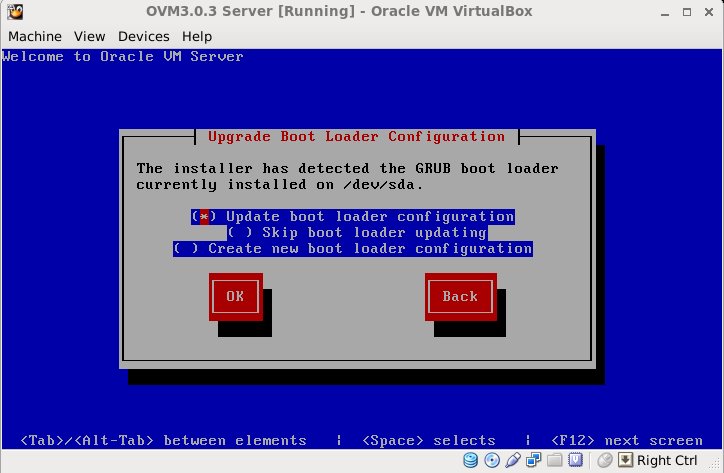
  • Reboot server and follow the screens.
  • Choose “Oracle VM server 3.1.1 (sda2)


Citrix Receiver install on OEL / Redhat 6.3

Download and install Citrix Reciver client

Install complained about alsa-lib sounds drivers. Apparently it needs 32bit alsa-lib so:

yum install alsa-lib.i686

Install complained about libcrypto so had to install the 32bit openssl

yum install openssl.i686

Modify the /opt/Citrix/ICAClient/util/integrate.sh script to include the correct Firefox config executable.

##########

found_netscape()
{
ALREADY_MIMETYPE=0
ALREADY_MAILCAP=0
arch=`uname -m`
if [ “$arch” = “x86_64” -a “$op_system” = “Linux” ]
then
# On 64 bit platforms one call to nspluginwrapper does all the work of
# linking.
mozilla-plugin-config -i $INST_DIR/npica.so
LINK_PLUGIN=0
else
LINK_PLUGIN=1
fi
################

After modifying integrate.sh you need to run it.

./integrate.sh

Next depending on your Company’s certificates, you may need to download the root certs from the cert provider.

http://www.geotrust.com/resources/root-certificates/index.html

Right click on “Geotrust Global CA” and save to your desktop as a .crt file
http://www.geotrust.com/resources/root_certificates/certificates/GeoTrust_Global_CA.pem

Right click on “Equifax Secure eBusiness CA-1” and save to your desktop as a .crt file
http://www.geotrust.com/resources/root_certificates/certificates/Equifax_Secure_eBusiness_CA-1.pem

Close Firefox and copy the two crt files into your Citrix cacerts directory.

cp ~/*.crt /opt/Citrix/ICAClient/keystore/cacerts

Restart Firefox and you should be good to go!

#######UPDATE##########

This also fixes the SSL issues. You do not need to download any Certs.

ln -s /etc/ssl/certs/* /opt/Citrix/ICAClient/keystore/cacerts/

CYGWIN install on Windows 8 ssh-host-config as well!

Install cygwin from cygwin.com

Run cygwin shell as “Administrator”

Run “ssh-host-config”

$ ssh-host-config

*** Info: Generating /etc/ssh_host_key
*** Info: Generating /etc/ssh_host_rsa_key
*** Info: Generating /etc/ssh_host_dsa_key
*** Info: Generating /etc/ssh_host_ecdsa_key
*** Info: Creating default /etc/ssh_config file
*** Info: Creating default /etc/sshd_config file
*** Info: Privilege separation is set to yes by default since OpenSSH 3.3.
*** Info: However, this requires a non-privileged account called ‘sshd’.
*** Info: For more info on privilege separation read /usr/share/doc/openssh/README.privsep.
*** Query: Should privilege separation be used? (yes/no) yes
*** Info: Note that creating a new user requires that the current account have
*** Info: Administrator privileges. Should this script attempt to create a
*** Query: new local account ‘sshd’? (yes/no) yes
*** Info: Updating /etc/sshd_config file

*** Query: Do you want to install sshd as a service?
*** Query: (Say “no” if it is already installed as a service) (yes/no) yes
*** Query: Enter the value of CYGWIN for the daemon: [] binmod ntsec
*** Info: On Windows Server 2003, Windows Vista, and above, the
*** Info: SYSTEM account cannot setuid to other users — a capability
*** Info: sshd requires. You need to have or to create a privileged
*** Info: account. This script will help you do so.

*** Info: You appear to be running Windows XP 64bit, Windows 2003 Server,
*** Info: or later. On these systems, it’s not possible to use the LocalSystem
*** Info: account for services that can change the user id without an
*** Info: explicit password (such as passwordless logins [e.g. public key
*** Info: authentication] via sshd).

*** Info: If you want to enable that functionality, it’s required to create
*** Info: a new account with special privileges (unless a similar account
*** Info: already exists). This account is then used to run these special
*** Info: servers.

*** Info: Note that creating a new user requires that the current account
*** Info: have Administrator privileges itself.

*** Info: No privileged account could be found.

*** Info: This script plans to use ‘cyg_server’.
*** Info: ‘cyg_server’ will only be used by registered services.
*** Query: Do you want to use a different name? (yes/no) no
*** Query: Create new privileged user account ‘cyg_server’? (yes/no) yes
*** Info: Please enter a password for new user cyg_server. Please be sure
*** Info: that this password matches the password rules given on your system.
*** Info: Entering no password will exit the configuration.
*** Query: Please enter the password:
*** Query: Reenter:

*** Info: User ‘cyg_server’ has been created with password ‘xxxxxxxx’.
*** Info: If you change the password, please remember also to change the
*** Info: password for the installed services which use (or will soon use)
*** Info: the ‘cyg_server’ account.

*** Info: Also keep in mind that the user ‘cyg_server’ needs read permissions
*** Info: on all users’ relevant files for the services running as ‘cyg_server’.
*** Info: In particular, for the sshd server all users’ .ssh/authorized_keys
*** Info: files must have appropriate permissions to allow public key
*** Info: authentication. (Re-)running ssh-user-config for each user will set
*** Info: these permissions correctly. [Similar restrictions apply, for
*** Info: instance, for .rhosts files if the rshd server is running, etc].
*** Info: The sshd service has been installed under the ‘cyg_server’
*** Info: account. To start the service now, call `net start sshd’ or
*** Info: `cygrunsrv -S sshd’. Otherwise, it will start automatically
*** Info: after the next reboot.

*** Info: Host configuration finished. Have fun!
$ net stop sshd
The CYGWIN sshd service is not started.

More help is available by typing NET HELPMSG 3521.


Change Permissions on /etc/ssh key files

chmod 600 /etc/ssh*key

chmod 755 /var/empty


Start it up!!!

net start sshd


Stop it yo!!

net stop sshd

Windows 8 Hangs

I just bought 2 licenses of the Released Windows 8 and overall I like it except my browsers were hanging / locking up for about 20 seconds repeatedly. Apparently there is an issue with the dynamic tick. What it will do is stop Windows from coalescing CPU clock ticks when idle, a feature added in Windows 8 for power savings.

Run this to fix the problem. Worked for me:

Open Command prompt as Administrator

bcdedit /set disabledynamictick yes